

Peterbuilt Boerboels · Kennel field guide
Dog-waste composting
A practical illustrated guide for multi-dog kennels.
By Peterbuilt Boerboels ·
Download the illustrated guide and batch log (PDF)The proposed setup combines batch bays, an empty turning bay, dry carbon storage and separate curing space. Start with a pilot and expand from measured daily output. Read the local site checks before construction.
Build one fresh batch.
Close, monitor and turn.
Store separately before use.
Arrange the work area
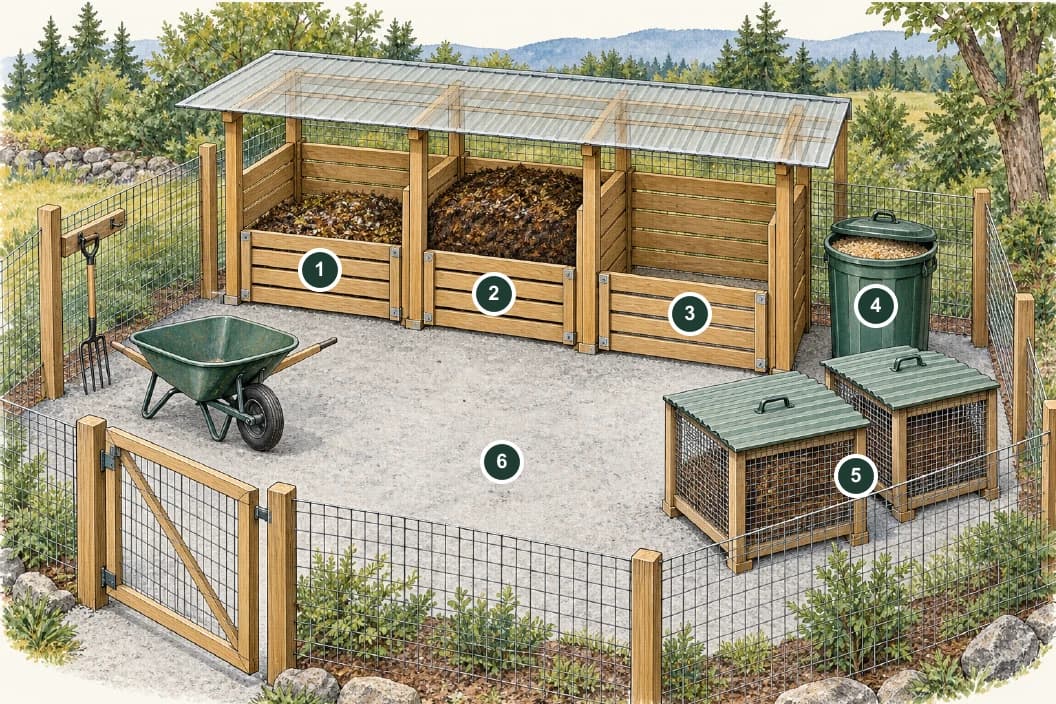
- Fresh batch. Only this bay receives new feces.
- Processing batch. Keep its ID and closing date visible.
- Empty turning bay. Keep free to rebuild a whole batch.
- Dry carbon. Store untreated sawdust under cover.
- Curing containers. Separate from raw-waste handling.
- Clear work aisle. Leave room for tools and a wheelbarrow.
Keep rain out and airflow in. The base is illustrative; its surface and any leachate containment must be selected for the site. Keep animals out and do not route waste liquid into soil, ditches or storm drains.
Make the bin easy to empty
Removable fronts give access to the entire batch when it is time to turn.
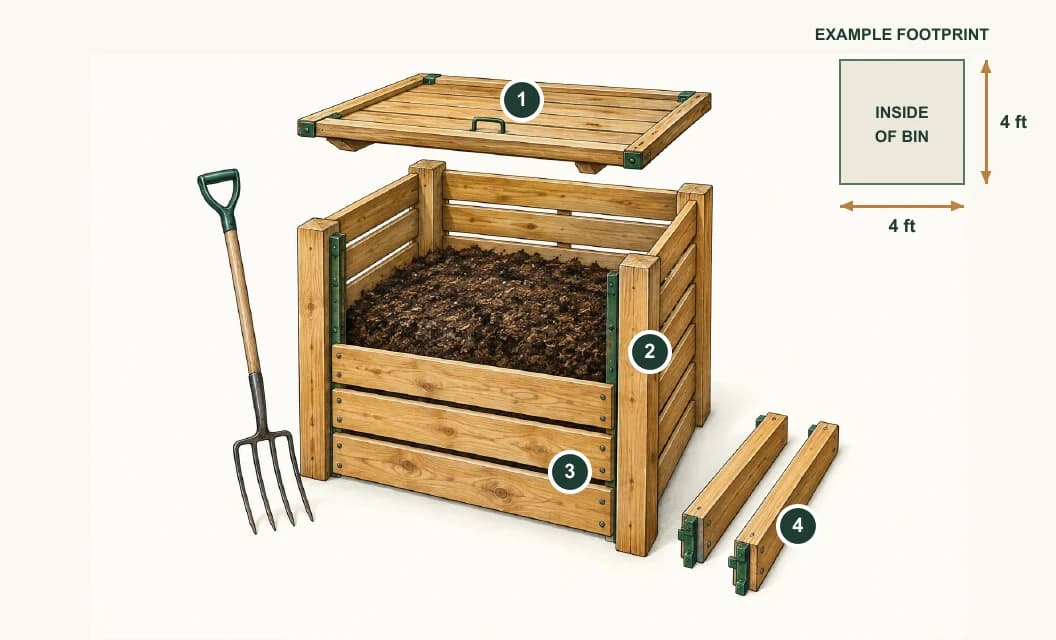
- Rain cover. Shown lifted; secure it for use.
- Ventilated walls. Sturdy, braced panels with air gaps.
- Front access. Lift out panels to turn the batch.
- Removed panels. Store safely clear of the work aisle.
Use the same scoop
A starting recipe by volume: two measures of feces to one measure of sawdust. [1]
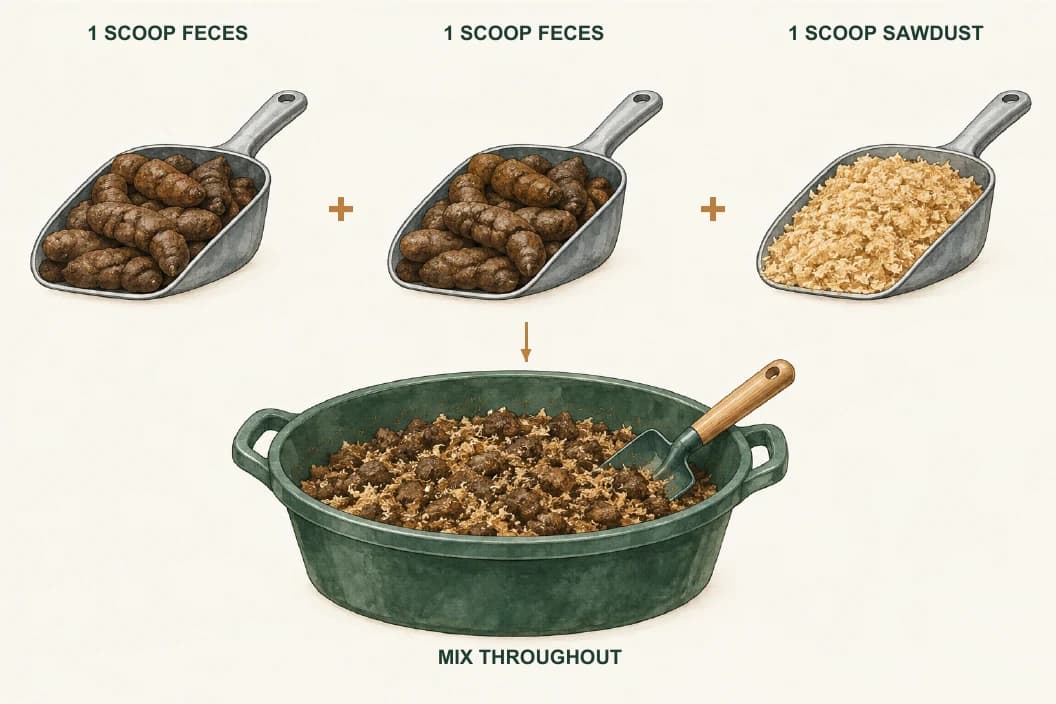
- Measure equal volumes. Use clean, untreated sawdust. Remove bags and foreign objects before loading.
- Adjust moisture. Aim for a wrung-out-sponge consistency. Add water gradually while mixing. [1]
- Close the batch. At a 2-3 ft fill depth, stop fresh additions, cover, and record the closing date. Move daily collection to another bay. [1]
Keep out: plastic, litter, treated-wood debris, food scraps, carcasses, medication containers and cleaning chemicals. This guide covers scooped feces, not kennel wash water.
Turn the outside inward
The whole batch must be rebuilt, not just stirred in the center.
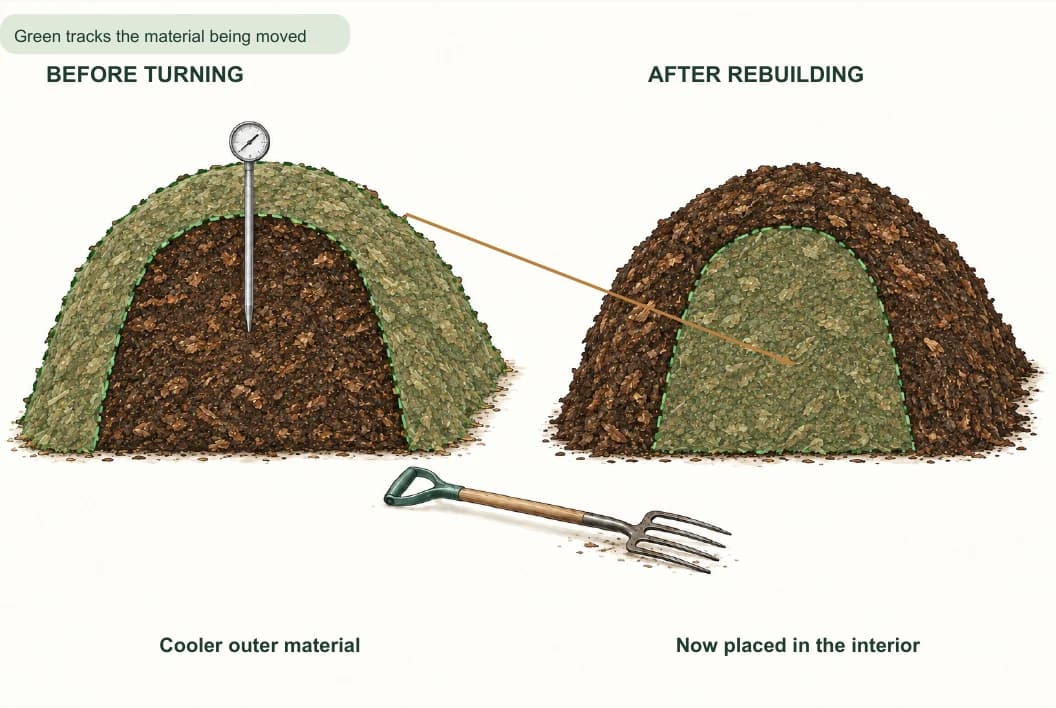
Record the heat. Check several locations daily. USDA specifies 145 F for several days with repeated full turnings; turn when temperatures decline. Processing can take six weeks or more, followed by several months of curing. A single hot reading does not verify the whole pile. [1]
Use the batch log on page 7 of the PDF. Record temperatures, probe locations, moisture, each complete turn and any corrections. Keep a consistent probe depth for comparable readings. Keep the batch ID with the material when it moves.
Keep the process on track
Each day: record fresh input, check processing batches, inspect rain covers and the work area, and update the log. Keep raw-waste tools separate from tools used for finished material.
- Cold or not heating
- Check moisture, air space and ingredient balance before assuming the batch is finished.
- Wet or sour-smelling
- Exclude rain, restore aeration and correct excess moisture with dry carbon.
- Dry and inactive
- Add water gradually while mixing, then continue monitoring.
- Above 160 F
- Manage heat through turning and controlled moisture adjustment. Hotter is not always better. [3]
Keep a batch on HOLD when: its records are missing, its heat process was unsuccessful, or fresh feces entered after closure. Reprocess with qualified guidance or use a confirmed accepting disposal facility. Appearance, smell and age alone do not establish pathogen removal.
Before use: ask a qualified local composting or agricultural adviser to review the process and identify any testing requirements. Record the release decision and destination. Reserve material for nonfood ornamental areas inaccessible to dogs. Do not put it back in dog runs or distribute it. [1]
Ill dogs or suspected parasites: use a veterinarian-advised waste-disposal route. Do not assume this process can manage an outbreak. Keep animals, especially puppies and pregnant females, away from the compost. [1]
One record for each batch
Print page 7 of the guide and continue on additional sheets until the batch is released or disposed of.
- Batch ID, collection start, closing date, bay or location, and operator.
- Date and time, temperatures in Fahrenheit at several probe locations including cooler edges, moisture, full turns or other actions, and initials.
- Curing start, release or HOLD decision, reviewer and destination.
Before you build
Confirm local requirements. In Polk County, Texas, contact Environmental Enforcement at 936-327-6831. Ask about onsite kennel-feces composting, setbacks, flood risk, groundwater, the base, runoff containment and permitted end use. Elsewhere, contact your own local authority. [4]
Walk the property after rain. Map puddles, flow paths, the well, septic components, ditches, pond, dog runs and nearby homes. Sandy ground is not permission to discharge leachate. Keep clean roof runoff outside the waste area. Have the base and liquid containment specified for the site.
Supplies to price. Braced exterior framing and corrosion-resistant hardware; ventilated panels and removable fronts; secured rain protection; fence and gate; dry carbon storage; dedicated fork, shovel and marked scoop; long-stem compost thermometer; gloves, boots and clipboard. Construction quantities depend on the approved layout.
Allow a fallback. Confirm a waste outlet before starting. If all bays are occupied or a batch fails, daily collection still needs somewhere to go. Extra curing capacity matters as much as the active bins.
Source notes
- USDA / NRCS, Composting Dog Waste (2005)
Specialized kennel recipe, batch handling, heat, turning, curing and use restrictions.
- EPA, Composting at Home
Pet feces are excluded from ordinary backyard compost.
- EPA, Approaches to Composting
Moisture, oxygen and temperature management; general active range of 131-160 F.
- Polk County, Environmental Enforcement
Local contact; site-specific permission has not been established by this guide.
Adapted from the Peterbuilt Boerboels illustrated kennel field guide. Layout and module dimensions are illustrative proposals. Artwork is AI-generated and labeled for instruction; it is not a record of an installed or tested Peterbuilt system.
Download the original eight-page guide (PDF)